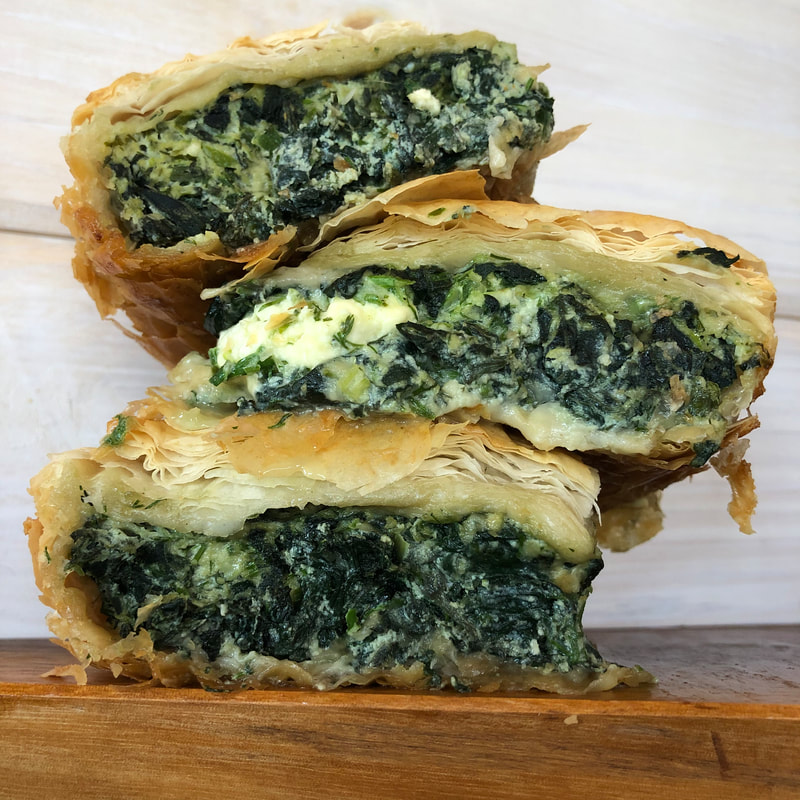
 The Greek savory pie known as spanakopita is traditionally made with spinach, but I prefer to make it with nettles (Urtica dioica). Although they are a stinging plant, nettles are one of the most beneficial and nourishing foods/medicines we have. Once its leaves are cooked or dried, it loses its sting. However, do not eat raw nettles. Nettles are filled with minerals, including iron and calcium- 10 times the amount of calcium and 23 times the amount of Iron compared to kale and if prepared properly, are very safe. Nettle is an excellent and safe tonic for pregnant women and is generally a nutritious and supportive herb.
This is one of my favorite dishes! It’s highly nutritious and tasty. One of my goals in my cooking is to find meals that are nutrient dense but that I also want to eat and get excited about. I harvest the nettles in the early summer and blanch them so I can use them throughout the winter. I also use these frozen nettles in my smoothies, lasagna, quiche, in quesadillas and anywhere else you might place a handful of frozen spinach while cooking. What you’ll need: 2 to 3 quart size bags full of frozen nettles (if using fresh nettles, blanch 2 big full bowls of them) 5 eggs 1 pound ricotta 1 pound feta 2 bunches fresh scallions 1 bunch fresh dill 1/2 pound butter (though I often use 1 pound) 1 package phyllo dough (thawed) Special kitchen tool: pastry brush Step by Step: 1. Place the frozen nettles on the counter the morning of the day you want to make spanakopita. It's important that they are thawed so you can squeeze all the liquid out of them so that it doesn't make your phyllo pastry moist, the buttery crispiness of the pastry is my favorite part. 2. When you are ready to make the spanakopita, squeeze the liquid out of the nettles thoroughly. 3. Chop the scallions and fresh dill. Add these, along with the eggs, ricotta cheese and feta cheese into the food processor and blend completely. If you don’t have a food processor you can mix these ingredients thoroughly in a bowl. Then mix the nettles in by hand. 4. Preheat the oven to 375 degrees. 5. Melt the butter. Use a pastry brush to cover (it is just like putting a large brush into butter and painting it onto the bottom of the pan) and brush it onto the bottom of a glass pyrex (approx. 9”x18”). 6. Layer approximately 10 phyllo sheets on the bottom of the pan with butter brushed between each layer. This needs to be done quickly because the phyllo dough dries out quickly and then it becomes more crumbly and harder to work with. As you do this the phyllo sheets might rip or tear, don’t worry about it too much, just lather on butter and the spanakopita will taste good! Put all of the nettle mixture on top of layered phyllo and spread it evenly. Layer the rest of the phyllo dough on top of the nettle mixture, buttering each layer. Butter the top and use a sharp knife to cut into squares (this is necessary because if you try to cut after baking the crispy phyllo will just fall apart). 7. Bake at 375 degrees for 30 to 45 minutes, until crispy and golden on top.
1 Comment
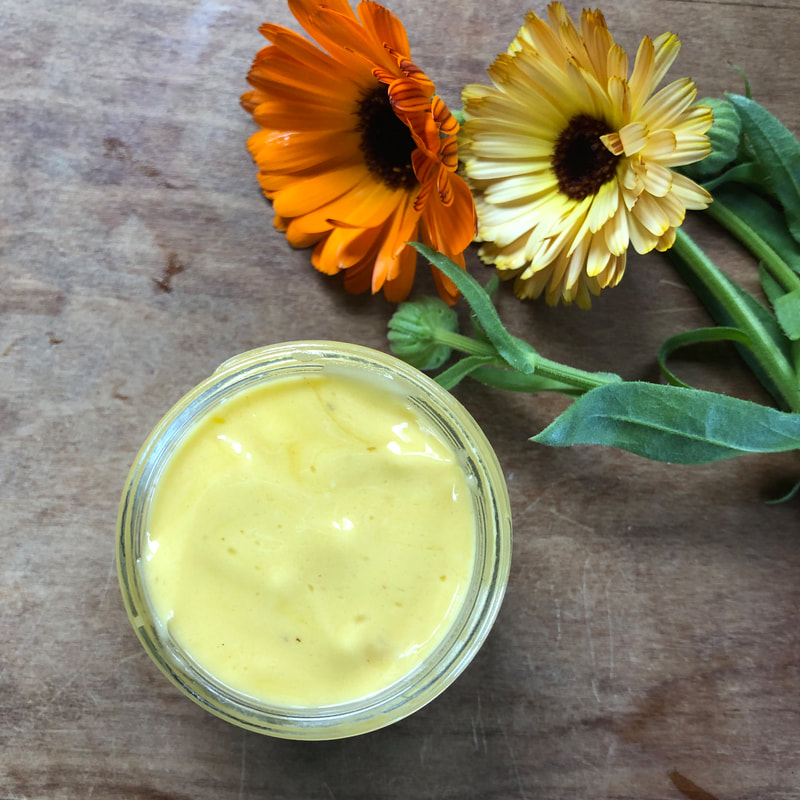 Calendula Cream (adapted from Rosemary Gladstar’s “Rosemary’s Perfect Cream”)
Ingredients for basic lotion * A water (i.e. pure distilled water, floral hydrosols, tincture or herbal infusions) * An oil (i.e. olive, sweet almond, apricot, grapeseed, jojoba, coconut) * An emulsifier (I’ve always used beeswax) * Natural preservatives (i.e. , vitamin E oil or grapefruit seed), optional * Natural additives (essential oils), optional Ingredients we are using here: 1 cup calendula infused oil (see recipe bellow for how to make this ingredient) ¾ ounce of beeswax ⅔- to 1 cup of distilled water Directions: There are two ways to make an infused oil (an ingredient you make first that goes into the cream). One is called the solar-infused method (also called the cold-infusion) which is created by infusing fresh calendula flowers in oil in the a warm, sunny spot. For the purpose of this blog post I’m sharing the recipe for the double boiler method because this method uses dried calendula blossoms which are available at many natural food stores and Herb shops in the Winter. 1. Heat a double boiler over low heat. Fill the double boiler about ¾ cup of dried Calendula flowers. Then pour room-temperature olive oil or sweet almond oil (approx. 1 ⅓ cup oil) over the herbs, making sure to completely cover the herbs by 1 inch. Olive oil will make a more oily lotion. If you want a smooth or less greasy texture go with sweet almond oil. 2. Bring to a slow simmer and simmer for 30 to 60 minutes. You could also put the Calendula and oil into a crockpot overnight on a low setting to infuse the herbs if you have the time. 3. Strain the infused oil through cheesecloth or muslin, making sure to squeeze oil out all the medicinal oil. Now you have your infused oil for the next steps in making calendula lotion. 4. Next combine distilled water, essential oil and vitamins in a glass measuring cup. Here we are just using distilled water so we will just measure it out in the measuring cup. 5. In a double boiler over low heat, combine the oil and beeswax (here we are using calendula infused almond oil) until the beeswax melts. 6. Pour the oils into a blender and let cool to room temperature. The mixture should become thick, creamy, semisolid and cream colored. This cooling process can be hastened in the refrigerator, but keep an eye on it so it doesn't get too hard. When cooled, turn blender on the highest speed. In a slow, thin drizzle pour the water mixture into the center vortex; note: make sure the water mixture is room temperature before blending with the oils. 7. When most of the water mixture has been added to the oils, listen to the blender and watch the cream. When the blender coughs and chokes, and the cream looks thick and white like butter cream frosting, turn off the blender. You can slowly add more water, beating it in by hand with a fork, but don't over beat! The cream will thicken as it sets. 8. Pour into cream or lotion jars. Store in the refrigerator (it will be thicker when you first pull it out of the refrigerator it will thin out as it warms to room temperature) or any dark, cool place. Notes: Here are the basic ingredients for lotion making you could also add. I just simplified my recipe to make it accessible. A water (i.e. pure distilled water, floral hydrosols, tincture or herbal infusions) An oil (i.e. olive, sweet almond, apricot, grapeseed, jojoba, coconut) An emulsifier (I’ve always used beeswax) Natural preservatives (i.e. , vitamin E oil or grapefruit seed), optional Natural additives (essential oils), optional  A few weeks ago, in the entryway to our home, I saw my oldest child yell at her brother and in turn, him yell at the baby. I “literally saw the seed of anger go from one child and on down”. I reflected on this, realizing that I was the one that started this seed, and that I wanted to change.
I don't want to be angry with my children. It doesn't feel good in my body and it frightens them. I feel horrible when my little three-year-old says, “Mom, I'm scared of your anger.” There's a wonderful book about anger and mindfulness, “Peace is Every Step” by Thich Nhat Hanh. He describes anger as weeds in a garden that need to be weeded and tended too regularly. In his book, Thich Nhat Hanh says if we continually weed the anger from our life through mindfulness, we will change. Anger feels uncomfortable in my body and is something that I want to transform; similarly as the liver or gallbladder would transform pollutants in the body. Dandelion root helps our liver and gallbladder to process toxins. In the Traditional Chinese system of the 5 elements Springtime is associated with the emotion of Anger and the element Wood. This is why in this animation I drew the transformation of the root of dandelion from a red, jagged Anger into renewal of a green and yellow leaf of light. When I feel anger or irritation arise when I am with my children, I walk away from whatever happened that triggered anger and go to a place I can be alone. Then in my head I have been saying, “this is anger, this is anger, this is anger, over and over again until I feel the wave pass. When I'm saying this, I don't focus on the person who made me angry. I don't focus on what happened. I don't focus on other times that the same thing happened. I just continue to bring my mind back to: “this is anger.” Once I am calmer and the initial crest has passed, I try to integrate a supportive visualization and breath work. I have been visualizing my anger as a gray or black cloud sort of coming into me as I breathe in and then coming out as I breathe out into light or sunlight radiating out. This is my process of transforming my anger internally similarly to how our liver and gallbladder transforms toxins in our body. Part II: Anger (animation for this part will be posted on IG later this Spring): I have noticed that I have three kinds of anger as a mother: irritation, present anger and old anger, or grief. I can use mindfulness to process my irritation and present anger. If it's the deeper, older anger, being triggered by my daughter in the present moment, I have a different healing process. Sometimes my daughter will say something to me and I'll be horrified by what she says. I'll have thoughts like How is that possible? How dare she? Who does she think she is? I think this is from my own past, my own grief that I wasn't able to do that when I was six years old. When I was her age I was a sweet, well-behaved girl who did exactly what I was told and didn't say anything back or as my parents used to say “talk back.” But I think what was really happening, was that I was really scared, maybe even repressed. These moments with my daughter trigger all of this pain and grief from my past when I was six. I have been making time for myself to be alone and grieve. For me, my grief usually starts with anger, once I give myself the space to feel and release the anger, or “deconstruct”, I always cry and feel the deep sadness underneath. I am going to create another animation showing this process, Part II of Anger series later this Spring. Years ago, an elder told me “Mother Earth can handle all of your emotions. Your anger, your sadness, your grief. You can give all of it to her.” She told me that at the core of my anger is the natural energy of destruction just like the waves on the ocean break down jagged rocks into smooth sand. Thich Nhat Hanh says, “We need the insight and non-dual vision of the organic gardener with regard to our anger. We do not need to be afraid of it or reject it. We know that anger can be a kind of compost, and that it is within its power to give birth to something beautiful.” Just as a mother can hold space for their child to have a temper tantrum and lovingly just be present with it, the earth can handle all of your feelings. At the time when she told me that I had an enormous amount of grief from my past, I went out into the woods and found a pile of sticks leaning on each other like a sort of shelter somebody had built. I was scared and I felt embarrassed. I felt like what I was doing was wrong, but I allowed myself to pick up a large stick and hit this pile of sticks and scream and scream and cry until I felt completely done. One thing that made me OK with doing it was that while I was hitting the sticks I noticed that they were getting smaller and breaking up into smaller pieces. So I had a thought, “Oh I'm just helping the earth decompose/deconstruct the sticks faster by breaking them into smaller pieces.” 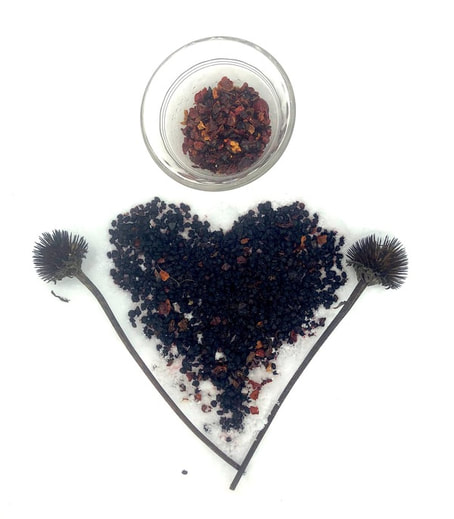 I want to spend some time talking about elderberry. For a long time I thought elderberry, used commonly in the winter, was a fad so I wasn't interested. Then there came a time when elderberry was the only herb I had available to me. I gave it a try and my opinion of it as a medicine changed dramatically.
When I was pregnant with my second child, my oldest daughter kept coming home from school with all sorts of Vermont winter colds and viruses. Because I was pretty worn down, I tried my Echincea tincture protocol, but got sick anyway! I had a bottle of elderberry, rose hip, echinacea syrup lying around that I had made with a friend earlier that summer and knew that it was safe during pregnancy, so I thought I would give it a try. I started with two to three tables every few hrs, and I felt better the next day! That inspired me to do more research on elderberry, beginning with Paul Bergner’s book The Healing Power of Echinacea and Goldenseal and Other Immune System Herbs. Apparently, my experience with elderberry was in alignment with what his book stated about its effects: that you will heal faster from a cold or virus. Berner charts the best times during sickness to use certain immune boosting herbs(p 248). Elderberry is mentioned as effective for all stages of colds, but for me, this was not the case. It’s only worked well for healing me faster once sick. However, all of our bodies are different and they respond to herbs differently. Find your own relationship to elderberry and all the wonderful healing plants for that matter! I like to add rose hips to this syrup because it is high in vitamin C which helps boost the immune system. It also tastes yummy! Echinacea is immune-boosting too, especially at the onset or beginning of a cold, so it adds strength to the syrup by including support for the immune system for all times/stages of a cold Elderberry, Rose Hip, and Echinacea Syrup What You’ll Need: 2/3 cup dry elderberries or 1 cup fresh 1/3 cup dried rose hips or 1 1/2 cups fresh 1/2 cup dried Echinacea Root 3 cups water 1 cup honey Note: these qualities are loose, your syrup will be good no matter what! Step by Step:
Bottle your syrup and store in the refrigerator for 2 to 3 months. I prefer to put mine into a brown bottle, but a mason jar is fine if you keep your syrup away from the light (the refrigerator does this fine). Make sure to label it! I can't tell you the number of times I didn't label some herbal concoction only to find myself sniffing it months later and trying to guess the mystery. 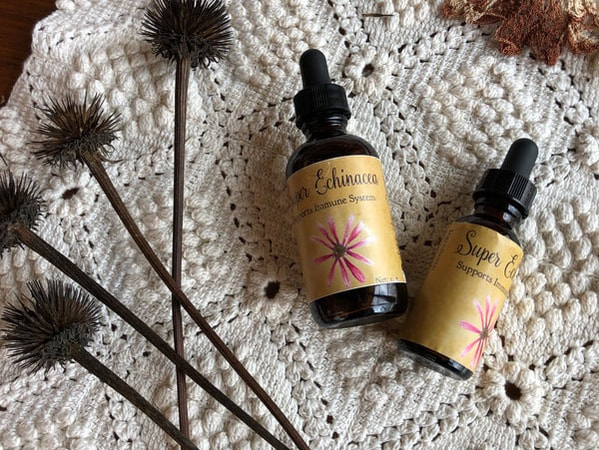 Echinacea purpurea or Echinacea angustifolia *This blog post is featured on my Echinacea note card in a shortened form: here is a more in depth look at tincturing and making medicine with the seeds, flowers, and roots of Echinacea Echinacea is a gorgeous plant with various shades of pink radiating out from the center of its lovely flower. In the summertime, the flower and seed heads are gathered when they are in full bloom. Roots are harvested in autumn anytime before the ground freezes.
Medicinally, echinacea is most well known for its immune-boosting properties, and for good reason. Its tincture is my go-to remedy all throughout the cold and flu season. I take two or three droppers full (you can put it into warm water if you want to) at the first sign of sickness as a great way to ward off a cold before it sets in, though taken during the course of illness will also lessen its severity. Notice the tingling sensation that arises when nibbling on its root-- this is how you know it’s working! The following recipe is especially great because it’s safe for kids, nursing moms, and pregnant women. Echinacea Tincture What you’ll need: Echinacea root (fresh or dry) Menstruum (alcohol, vinegar, or vegetable glycerin) Jar & Lid Optional: Brown Dropper Bottle Notes: If fresh Echinacea root is available, it’s preferred, but dried will work just as well. Some people use the flowers and seeds in their tincture too. I tried making a tincture with all of these parts and I thought the tincture wasn't as potent as the ones I have made only utilizing the roots. I encourage you to try for yourself and find what you like! Every herbalist has their own relationship to the plants and their medicines and needs to find their own way. My experience is that alcohol makes the most potent medicine, but sometimes I prefer to use vinegar or vegetable glycerin. Some people are sensitive to alcohol. You can remove some alcohol from an alcohol tincture by placing the tincture in boiling water for 2 minutes, but this does not remove all of the alcohol, only about 50%. Vegetable glycerin tastes yummy which makes it more palatable for kiddos. It is also a great option for those in recovery. Step by Step:
One of the BEST cold and flu remedies is chicken soup! I think it is healing in some mysterious ways...
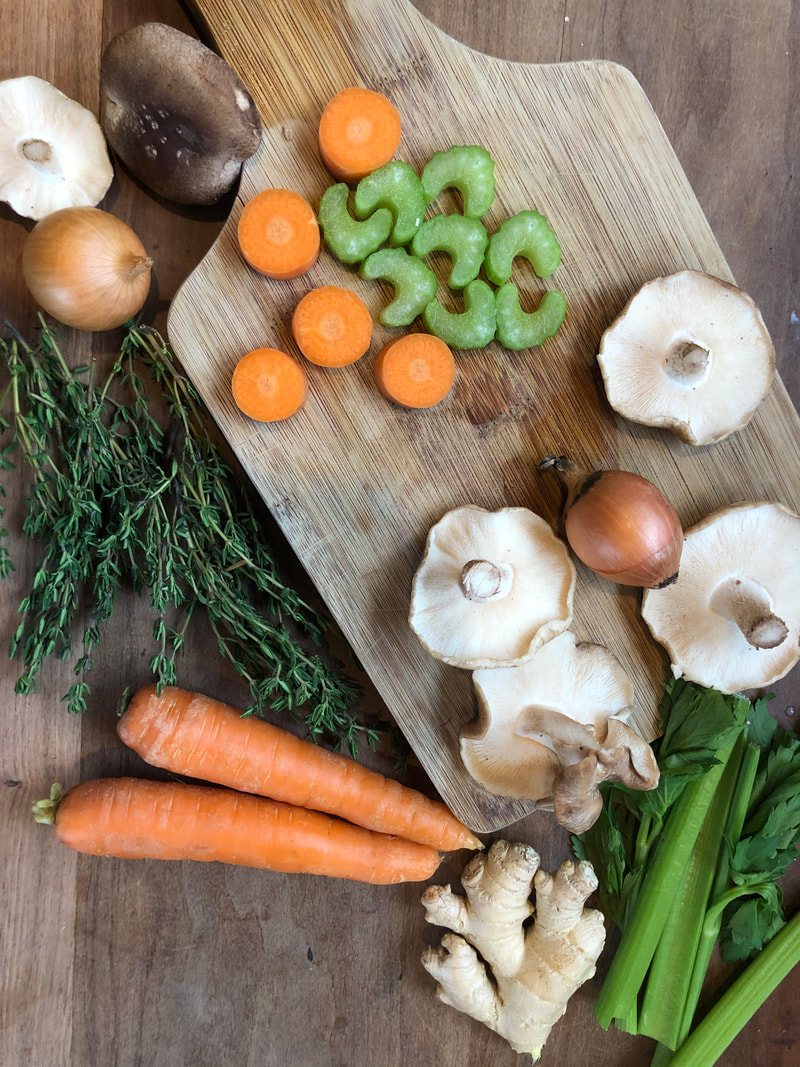
I once went to visit a good friend of mine and showed up with a sore throat. She had been making chicken soup, and after eating some as well as laughing with her for hours, I left feeling so much better. I don't know what in her chicken soup healed me- I’m sure the laughter helped- but I'm showcasing it as one of the best cold and flu remedies I know because that's how it has made me feel. Years ago I took a class with Betzy Bancroft (co-director of the Vermont Center of Integrative Herbalism in Montpelier) on making broth to support the immune system. She taught me about incorporating immune boosting herbs and mushrooms, like astragalus, codonopsis, shiitake, reishi, and turkey tail into my recipes. Astragalus is generally used before one gets sick to strengthen one's whole system, physically and energetically. Reishi mushrooms are another immune-boosting addition to broth, but they can add bitterness so I don’t add too much. I have made broth with and without these immune boosting additions and I find it healing either way. I also make my broth the way that nutritionist Sally Fallon recommends. She has a note in her book Nourishing Traditions “that Jewish folklore considers the addition of chicken feet the secret to successful chicken broth.” For years I made broth without chicken feet because I found them difficult to come by. This is the first winter I am actually making my broth with chicken feet! I finally found some from a local farmer who raises chickens as meat birds, who I was already purchasing meat from. I agree with this Jewish folklore because the chicken broth I’ve made without feet is nourishing and tasty but misses the gelatin quality (which makes sense because a chicken’s feet are the part of the animal that has the most ligaments and movable joints, where there is a lot of gelatin). I have noticed when I am eating chicken broth with a lot of gelatin, my digestion functions more smoothly. I’ve also noticed that my joints feel more flexible and less stiff, so I think these are just some of the healing properties of gelatin and I’m sure there’s a lot more we don’t even know about. I included a video here on how I like to process chicken feet because it's hard to describe in words. I’d like to add to this video that if you put chicken feet in boiling water for too long (in my case it was only about 20 seconds) the membrane actually cooks to the feet and makes it really, really difficult to remove. Though with practice you’ll be able to feel out the right timing by the feel of the feet. What You’ll Need: Leftover chicken bones after roasting a chicken (Backs, necks, wings, breastbones, legs) 2 to 8 chicken feet (if possible) 4 quarts water 1 large onion 2 T apple cider vinegar 2 carrots, coarsely chopped 2 to 3 stalks celery, coarsely chopped 3” to 6” piece of chopped ginger (optional) A small handful of astragalus root and/or codonopsis root (optional) Shitake, turkey tails, and/or reishi (optional) Fresh thyme (optional) Salt to taste Step by Step:
Starting a business takes an enormous amount of commitment, courage, and strength. The last eight weeks have been one the most intense times I’ve ever experienced in my life. I had no idea that launching a business would require so much of me. I suppose I was hoping for it to be a slower, more gradual process...but no, the state of Vermont gave me a deadline!
I am part of the Restart Vermont Initiative as a response to COVID-19, for which I received a marketing consultant, Kim Dixon, and we were given two months to complete an enormous amount of work (And ok, I may have kept adding more and more to it to make sure I was thorough). During this time we met once or twice a week for about an hour to an hour and a half for trainings and strategic planning. It may have been a blessing that we had to complete this work in only eight weeks because the level of challenge kept getting harder and harder. Overcoming each obstacle gave me momentum for the next. It was like being in labor: there were waves of intensity that just kept getting more and more painful. I also had to assemble a team of support at a very quick rate. I hired both a graphic designer and an editor during this time: my “birth team,” much like a doula or midwife. One of the hardest parts was having to rapidly learn entirely new skills, like setting up an Instagram, “CRM” (customer relations management), creating a shipping from home center with Shippo.com, updating my website, writing blog posts like this one, using new technology, and online marketing. I worked laboriously on this, days, nights, and weekends. Similar to my experience in labor I would sleep for maybe forty five minutes at a time before experiencing another wave of intensity, and then sleeping again for a little while. It wasn’t just learning these programs and new skills that made it painful. More than anything it was the vulnerability of putting myself on the internet. It takes a lot of courage to be afraid of something and do it anyway. I'm very scared to share these things on the internet for anybody to read but I'm doing it anyway. I'm doing it because right now, more than anything, I want to be a contributor in the world’s healing in every and any way that I can. With White Lotus Designs, I wish to reconnect people with nature’s nourishment and protection, and hopefully inspire them further to protect our mother earth in turn. I've been so inspired! I wake up and I'm excited about my day, excited about the creative process, and this is why I want to run my business, White Lotus Designs. It is a labor of love. I hope this blog post inspires and encourages you when you're starting a business to stick with it, to know that it's really intense but it's worth it: just remember that if I can do it, you can too. Cold Care Capsules Recipe
My ideal approach to herbal medicine is to preventively strengthen our systems through nourishment, rather than take really strong herbs to "fight" a disease or sickness once it has really started. A really solid, good night of sleep is the most important thing for the immune system to heal, though that can be hard with young kids. When I’ve gotten sick in the past I was often sleep deprived and had a young baby waking me up to nurse several times a night. I took echinacea tincture numerous times a day (4 or 5 droppersful every 2 hrs in the daytime and maybe 6 to 8 droppersful just before bed and some if I woke up anytime in the night) and getting some real solid sleep as soon as I felt any possible cold coming on. For me, the first sign of a cold is a sore throat, a little funny feeling behind my ear, and often more earwax. If I take echinacea in a real consistent system I don't get any worse and sort of ward off the cold as long as I get some solid sleep and rest during the day. One of my teachers calls this period "the threshold," the time just before a cold sets in. Before I had children I used "Cold Care Capsules" to do the same thing, but they aren't safe while pregnant or breastfeeding. They also have two ingredients in them, Goldenseal Powder, which takes a really long time to grow, and Slippery Elm, which are both at risk for being overharvested and becoming extinct.* I have included the recipe for them here, because it is an AMAZING recipe that has kept many colds at bay for me, before I had children. (And check out one of my other blog posts for a great echinacea tincture recipe if you are pregnant or breastfeeding!) Cold Care Capsules 1pt Golden Seal Powder 1pt Myrrh 1pt Slippery Elm (Marshmallow pwd works similarly) 1pt Echinacea pwd 1/4pt Cayenne pwd Note: When this recipe says 1pt it means weight, but if you don't have a kitchen scale to weigh the herbs, just eye it, the capsules will be good! And you don’t have to worry about safety so long as you don’t take too many and follow my protocol in the “to use” section. Step by Step:
To Use: To ward off a cold at its "threshold" take 2 of these with water every 2 hrs (this is an adult dosage only). Consistency is really important as well as continuing to take them a little longer after the symptoms are gone (in my case my throat might feel better or the funny ear feeling is gone). * The United Plant Savers has a list of "At Risk Species" (including Goldenseal and Slippery Elm |
Sage BarberHerbalist and artist who is inspired by nature and the healing plants all around us. Archives
May 2022
|

 RSS Feed
Copyright © 2020